Earlier in this blog is a post about my mother's Oat Bran Muffin recipe, which I love because it's delicious, nutritious, and easy. It's super-healthy but you'd never know it unless you looked at what is (and isn't) in there.
Since then I've changed the way I make them--same great recipe, slightly different method and outcome. I like the new result--fewer muffins, but each one a little heartier in texture and size, but still with a lightly moist, fine crumb.
I used to refine the oat bran in my food processor, since the recipe was formulated for Quaker Oat bran, whose flakes are lighter than the variety I scoop up from the WinCo bulk bins. This results in a small, finely textured muffin with a lightly rounded top. Then, I'd just add the remaining ingredients to the oat bran and let the food processor's blades mix the whole thing up. So easy.
Then I read that processing eliminates too much of the air bubbles that form in the batter, and that even a recipe like this with no glutenous ingredients like wheat flour (where overmixing will result in a tough, rather than crumbly, muffin) still wants to be minimally mixed. So I processed the bran to refine it, and did my mixing with a spoon in a bowl.
Then one day I didn't feel like hauling big equipment out of the pantry. I wanted to use the WinCo oat bran in its rustic state, but thicker bran flakes soak up less liquid, and the end result would be a flatter, gooier muffin. So, after putting everything together, I let the mixture sit for 30 minutes, giving it a chance to thicken itself up. As I scooped the hearty batter into the muffin pan it stayed mounded and I could put more in each well (without flour, these muffins raise only a little, but the result is as tender and finely-crumbed as regular recipes). I'm a hungry girl. I like bigger muffins!
One ingredient change was from honey to agave syrup. Honey is hard to mix well because the cooler liquids harden it.
So here's my favorite oat muffin recipe again, with my slightly different process.
2 cups oat bran
2 tsp baking powder
3/4 tsp salt
1/2 cup orange or grapefruit juice
1/4 cup agave syrup or honey
2 tbl oil
2 eggs
1 cup mashed ripe banana
Add-ins: chopped nuts, blueberries, dried fruit, etc.
Heat oven to 365f. Spray the wells of a metal or silicone muffin pan. Mix dry ingredients together and set aside. In your pyrex measuring container, pour grapefruit juice to 1/2 cup line, then pour in agave syrup to the 3/4 cup line. Then add mashed banana to the 1 3/4 cup line (this is way easier, more accurate than measuring each one in a separate measuring cup).
Transfer to another bowl, add the oil and eggs, and mix together. If your pyrex container is 4 cups or more, just add the oil and the eggs right there, plunge in your immersion blender, and mix the whole thing up.
Add wet ingredients to dry and mix with a spoon or spatula only until all is incorporated. Add any extras (my favorites: chopped dried cranberries, chopped pecans, mini chocolate chips) and gently mix.
Time for a catnap or another episode of GLOW.
After 30 minutes or so, come back and scoop batter into the muffin pan, letting it mound above the surface.
Bake for 25-30 minutes until nicely golden. Let cool in pan. Run a knife or thin spatula around edges and turn out on a rack. Muffins keep well in fridge for several days--just warm them in the microwave for 30 seconds or so.
The next morning--muffins with a little skyr and strawberry preserves, coffee and the morning paper on the patio.
Tuesday, August 20, 2019
Monday, July 29, 2019
The delicious fruits of (amazingly little) labor
"Hi Honey, what kind of jam have you made lately?" My mom knows this is a sure-fire way to guarantee a couple of fresh jars coming her way next time I drive out for a visit. She's a good cook, makes all sorts of delicious dishes--but never jam. She spent too many summer days wrestling with flats of the discount produce my grandfather brought home, that had to be processed immediately or spoil by sundown. The steaming hot kitchen, sticky tabletop, boiling vats of water for sterilizing empty jars and processing filled ones. She catches sight of a metal screw top ring and shudders from the flashbacks.
Ahhh, I love the modern age. To be honest, besides jam my canning experience is limited to the spaghetti sauce I made from bushels of Roma tomatoes gleaned from the margins of a Del Monte field outside Sacramento one summer. It was a lot of fun, but unless I get my hands on that many free tomatoes again it's a one-off experience.
Jam, on the other hand. Anytime, any season--there's always going to be something I can whip up into a jar of happiness with very little time, effort, or mess. Not a single drop of sweat unless I decide to dance a little cumbia while the jam thickens.
Today's batch is my latest favorite, plum grapefruit. A combination born of intemperance--I'd eaten too many of the plums to have enough for a full batch, so I grabbed a couple of grapefruit and made up the difference. What I ended up with is lightly sweet and just enough tart, fragrant with plums and citrus zest and (in my latest version) intensified with a touch of cardamom.
First steps, plus a little information:
Sanitize nine 8-oz jars and screw rings. I simply add them to a load in the dishwasher and press the "hi-temp wash" button. Place nine new lids in a small saucepan, cover with water, and set on low heat. The lids must be new, or the jars won't seal properly. New jars come with screw rings and lids. If you're using old jars without screw rings, buy a box of new rings/lids. If you have rings, you can get a box of just lids. Target, Wal-Mart, and most supermarkets carry all these supplies, plus pectin, wide-mouth funnels, etc.
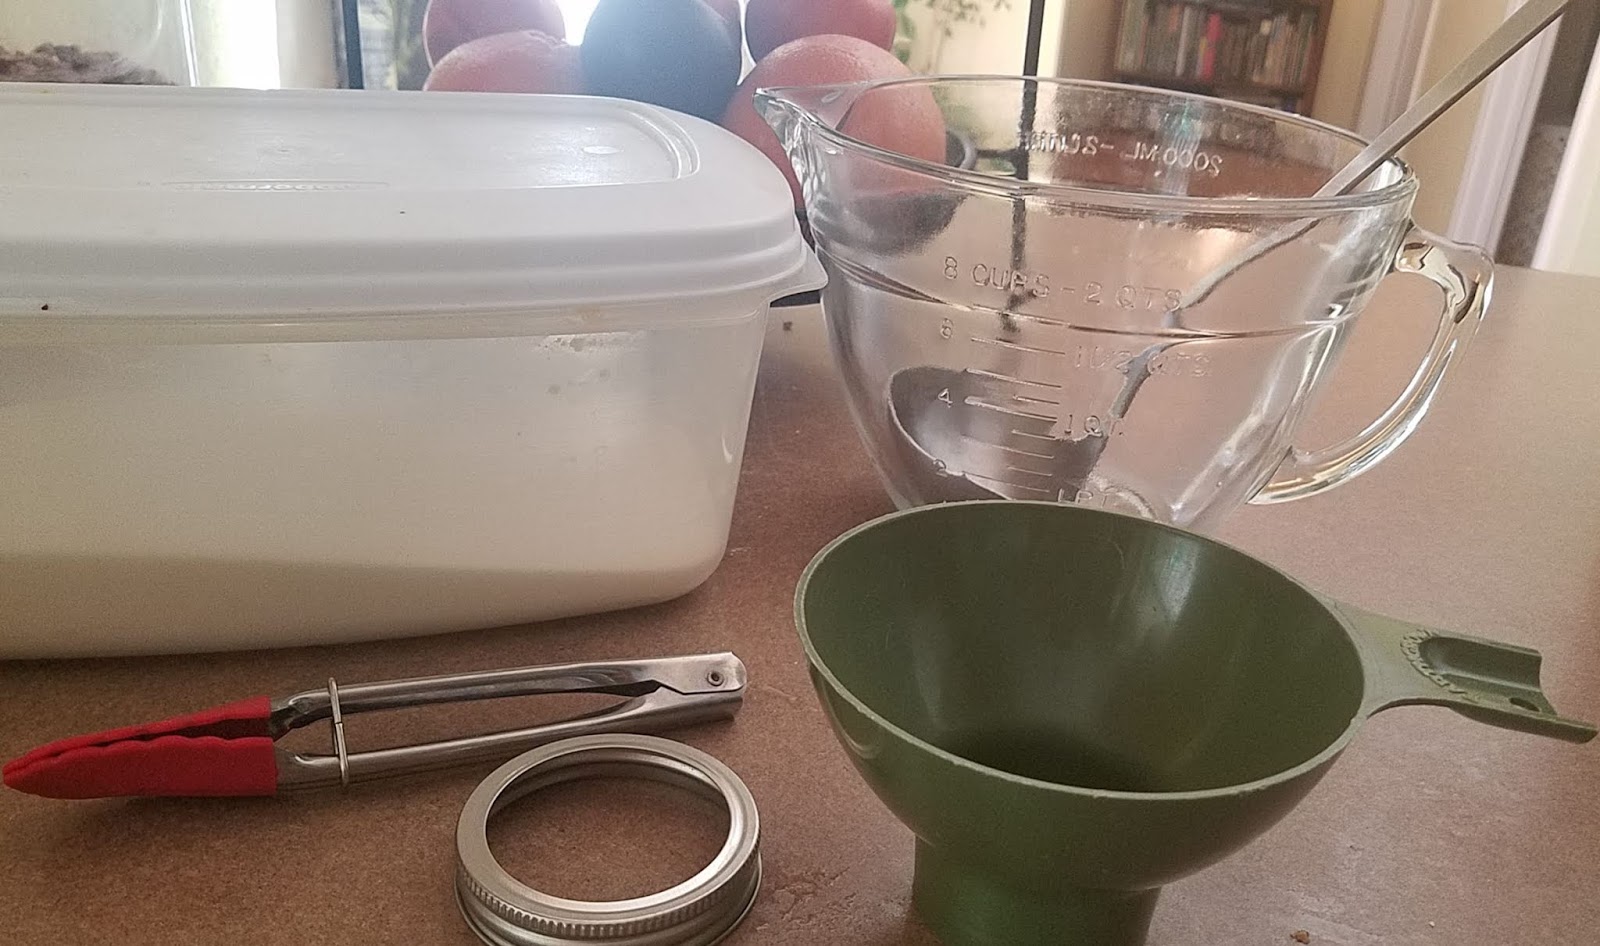
Also, you need a clear or translucent container. I use a large pyrex 8-cup measuring bowl. You can fill a glass bowl or plastic container with 6 1/2 cups of water, mark the line with a piece of scotch tape, and then go water your plants or use the water to boil spaghetti.
Set your sanitized jars next to the stove, ready to fill with jam. Turn the heat up under the saucepan containing the lids.
Plum Grapefruit Jam
6 generous-sized plums
2-3 grapefruit
4 1/2 cups sugar
1 box low-fruit pectin
1/4 tsp ground cardamom
Freshly ground black pepper
Cut the plums into large chunks, removing pits, and place in measuring bowl along with 1/2 cup water. Zest the grapefruit into the bowl, pare all the pith off the grapefruit, take out any seeds, and press chunks of grapefruit into the bowl until the juice fills up all the spaces between the plum chunks. Keep adding and pressing down grapefruit until the juice comes up to the 6 1/2 cup line.
Put the fruit mixture into a large pot over medium heat. Cook at medium-low for about 5 minutes. Puree with an immersion blender (if you don't have one, buy one because it will make your life easier so often you won't believe you survived without it OR puree the hot mixture in 2-3 batches in your regular blender).
Measure 4 1/2 cups sugar into a bowl. Remove 1/4 cup of that sugar and place in a small bowl, then mix in the box of powdered pectin, the cardamom, and a few turns of black pepper (these spices aren't required, but the fruit tastes SO MUCH MORE with them).
Add the sugar/pectin mixture into the fruit in the large saucepan and, stirring continually, bring to a rolling boil (one that doesn't stop bubbling no matter how much you stir) over high heat. Add the remaining sugar all at once, and bring again to a rolling boil. Boil for EXACTLY ONE MINUTE. Remove from heat. Turn heat off under saucepan containing lids.
Place the funnel in a jar and ladle hot jam into it, leaving 1/4" gap at top (I remove the funnel before I add that last little bit so I can eyeball the 1/4" gap). Wipe any drips off the rim, remove a lid from the saucepan using tongs, place on top of the jar, and screw a ring on. Pick up the jar with a towel to protect your fingers from the heat while you tighten the ring. Place the jar upside down on a towel spread out on the counter. Repeat this for the rest of the jam. Work quickly because you want the jam to be very hot as it goes into the jar, since its heat is what will seal the lid onto the rim and, as it cools, create a vacuum. Because it's just fruit and sugar, this lid-sealing/vacuum-creating process is all you need (unlike other forms of canning which require immersion processing).
Let the jars rest upside down for at least five minutes. Depending on your personality, this is a good time to:
A) Wash the bowl and pot and wipe down the counters
B) Relax with a cocktail because you just spent a whole half hour making jam!
Turn the jars right-side up, and as they continue to cool listen for that telltale "pop" as the cooling airspace inside creates a vacuum. You can also simply press the cooled lids with your finger--if they don't pop back at you, the vacuum seal is created. These jars of jam will keep at least six months on the shelf. If you still have any left (how could you? when every friend is going to want their own jar or two) pop it in the fridge, where it will keep for another year (in theory. No jam has ever gone uneaten that long).
Make yourself some jam and almond butter toast with the leavings you scraped out of the pot before you washed it. Mix yourself another cocktail.
Ahhh, I love the modern age. To be honest, besides jam my canning experience is limited to the spaghetti sauce I made from bushels of Roma tomatoes gleaned from the margins of a Del Monte field outside Sacramento one summer. It was a lot of fun, but unless I get my hands on that many free tomatoes again it's a one-off experience.
Jam, on the other hand. Anytime, any season--there's always going to be something I can whip up into a jar of happiness with very little time, effort, or mess. Not a single drop of sweat unless I decide to dance a little cumbia while the jam thickens.
Today's batch is my latest favorite, plum grapefruit. A combination born of intemperance--I'd eaten too many of the plums to have enough for a full batch, so I grabbed a couple of grapefruit and made up the difference. What I ended up with is lightly sweet and just enough tart, fragrant with plums and citrus zest and (in my latest version) intensified with a touch of cardamom.
First steps, plus a little information:
Sanitize nine 8-oz jars and screw rings. I simply add them to a load in the dishwasher and press the "hi-temp wash" button. Place nine new lids in a small saucepan, cover with water, and set on low heat. The lids must be new, or the jars won't seal properly. New jars come with screw rings and lids. If you're using old jars without screw rings, buy a box of new rings/lids. If you have rings, you can get a box of just lids. Target, Wal-Mart, and most supermarkets carry all these supplies, plus pectin, wide-mouth funnels, etc.
Also, you need a clear or translucent container. I use a large pyrex 8-cup measuring bowl. You can fill a glass bowl or plastic container with 6 1/2 cups of water, mark the line with a piece of scotch tape, and then go water your plants or use the water to boil spaghetti.
Set your sanitized jars next to the stove, ready to fill with jam. Turn the heat up under the saucepan containing the lids.
Plum Grapefruit Jam
6 generous-sized plums
2-3 grapefruit
4 1/2 cups sugar
1 box low-fruit pectin
1/4 tsp ground cardamom
Freshly ground black pepper
Cut the plums into large chunks, removing pits, and place in measuring bowl along with 1/2 cup water. Zest the grapefruit into the bowl, pare all the pith off the grapefruit, take out any seeds, and press chunks of grapefruit into the bowl until the juice fills up all the spaces between the plum chunks. Keep adding and pressing down grapefruit until the juice comes up to the 6 1/2 cup line.
Put the fruit mixture into a large pot over medium heat. Cook at medium-low for about 5 minutes. Puree with an immersion blender (if you don't have one, buy one because it will make your life easier so often you won't believe you survived without it OR puree the hot mixture in 2-3 batches in your regular blender).
Measure 4 1/2 cups sugar into a bowl. Remove 1/4 cup of that sugar and place in a small bowl, then mix in the box of powdered pectin, the cardamom, and a few turns of black pepper (these spices aren't required, but the fruit tastes SO MUCH MORE with them).
Add the sugar/pectin mixture into the fruit in the large saucepan and, stirring continually, bring to a rolling boil (one that doesn't stop bubbling no matter how much you stir) over high heat. Add the remaining sugar all at once, and bring again to a rolling boil. Boil for EXACTLY ONE MINUTE. Remove from heat. Turn heat off under saucepan containing lids.
Place the funnel in a jar and ladle hot jam into it, leaving 1/4" gap at top (I remove the funnel before I add that last little bit so I can eyeball the 1/4" gap). Wipe any drips off the rim, remove a lid from the saucepan using tongs, place on top of the jar, and screw a ring on. Pick up the jar with a towel to protect your fingers from the heat while you tighten the ring. Place the jar upside down on a towel spread out on the counter. Repeat this for the rest of the jam. Work quickly because you want the jam to be very hot as it goes into the jar, since its heat is what will seal the lid onto the rim and, as it cools, create a vacuum. Because it's just fruit and sugar, this lid-sealing/vacuum-creating process is all you need (unlike other forms of canning which require immersion processing).
Let the jars rest upside down for at least five minutes. Depending on your personality, this is a good time to:
A) Wash the bowl and pot and wipe down the counters
B) Relax with a cocktail because you just spent a whole half hour making jam!
Turn the jars right-side up, and as they continue to cool listen for that telltale "pop" as the cooling airspace inside creates a vacuum. You can also simply press the cooled lids with your finger--if they don't pop back at you, the vacuum seal is created. These jars of jam will keep at least six months on the shelf. If you still have any left (how could you? when every friend is going to want their own jar or two) pop it in the fridge, where it will keep for another year (in theory. No jam has ever gone uneaten that long).
Make yourself some jam and almond butter toast with the leavings you scraped out of the pot before you washed it. Mix yourself another cocktail.
Monday, November 12, 2018
I'd write more often if I remembered to photograph...
A good food blog needs pictures. I want to see what I'm thinking of cooking. So, this blog needs pictures. The problem is, I usually think about blogging AFTER I've made something and so...no photos. Meaning only sporadic blog posts.
Case in point. Tonight Tim's dad Joe was dropping by not long after we got home from a day in the city, so I wanted something quick. But also warm and nourishing. And I wanted to use up stuff in my fridge/freezer/pantry. What I like to call Fridgeluck Supper, and so often what ends up being my latest favorite dish. I never did think to photograph even the final product because Joe was here and we were all chatting and setting the table and the next thing you know it's a few leftovers in a tupperware. But I need to write down what I did so I can remember to do it again. Might as well do it here. And then I will make it again and hopefully remember to photograph it so this entry can at some point have those pictures that make it a blog worth reading.
I had a ziplock storage bag of my favorite steamed rice mixture in the freezer, so I started there, then gathered together the rest. Starting with how I make the rice to begin with, here's the recipe:
1/2 cup brown basmati rice
1/4 cup black rice (WinCo Forbidden Rice)
1/4 cup freekeh
1 Tbl herbes de Provence
1 3/4 cups water
Steam all the above together until done. I make this in larger batches, portion it into freezer bags, and then always have it on hand. The freekeh has a lightly smoky flavor and makes everything taste more substantial and HEAVENLY.
1 smallish butternut squash, peeled and diced into 1/2" chunks. Steam until tender.
3 medium-size carrots, diced 1/4"
1/2 onion, diced
3 stalks celery, diced
1 Japanese eggplant, diced 1/2"
1/2 cup dry toasted slivered almonds
1/2 - 1 cup frozen peas, thawed a little in the microwave
In a large saute pan, heat 2-3 Tbl oil. Saute carrots until they start to get tender. Add onion, celery, eggplant. Saute until onion looks translucent. Add steamed rice mixture and saute a bit more. Add almonds. Add peas and stir until they are warm. Salt to taste.
Heap the rice mixture in a large shallow bowl. Arrange steamed butternut squash around the perimeter. If you are having a protein, arrange that in the center. Tonight I simply grilled a few chunks of Andouille sausage for Tim and Joe, although Joe never did get around to spooning his portion of the sausage onto his plate and didn't miss it one bit. Gus, our Lab/Shepherd mix, happily ate his sausage for him.
We ate this with a little naan and a cucumber salad (cucumber, diced tomatoes, dill, mint, salt, goat-milk yogurt, and a little mayo). I sure wish I had taken a photo.
Of course I have enough leftovers for 2 lunches later this week. Of course they'll taste even better the second and third time around. Flavors like this always develop further over a day or two. And because I wrote a blog post I'll remember this and make it again. Hopefully, there will be pictures.
Case in point. Tonight Tim's dad Joe was dropping by not long after we got home from a day in the city, so I wanted something quick. But also warm and nourishing. And I wanted to use up stuff in my fridge/freezer/pantry. What I like to call Fridgeluck Supper, and so often what ends up being my latest favorite dish. I never did think to photograph even the final product because Joe was here and we were all chatting and setting the table and the next thing you know it's a few leftovers in a tupperware. But I need to write down what I did so I can remember to do it again. Might as well do it here. And then I will make it again and hopefully remember to photograph it so this entry can at some point have those pictures that make it a blog worth reading.
I had a ziplock storage bag of my favorite steamed rice mixture in the freezer, so I started there, then gathered together the rest. Starting with how I make the rice to begin with, here's the recipe:
1/2 cup brown basmati rice
1/4 cup black rice (WinCo Forbidden Rice)
1/4 cup freekeh
1 Tbl herbes de Provence
1 3/4 cups water
Steam all the above together until done. I make this in larger batches, portion it into freezer bags, and then always have it on hand. The freekeh has a lightly smoky flavor and makes everything taste more substantial and HEAVENLY.
1 smallish butternut squash, peeled and diced into 1/2" chunks. Steam until tender.
3 medium-size carrots, diced 1/4"
1/2 onion, diced
3 stalks celery, diced
1 Japanese eggplant, diced 1/2"
1/2 cup dry toasted slivered almonds
1/2 - 1 cup frozen peas, thawed a little in the microwave
In a large saute pan, heat 2-3 Tbl oil. Saute carrots until they start to get tender. Add onion, celery, eggplant. Saute until onion looks translucent. Add steamed rice mixture and saute a bit more. Add almonds. Add peas and stir until they are warm. Salt to taste.
Heap the rice mixture in a large shallow bowl. Arrange steamed butternut squash around the perimeter. If you are having a protein, arrange that in the center. Tonight I simply grilled a few chunks of Andouille sausage for Tim and Joe, although Joe never did get around to spooning his portion of the sausage onto his plate and didn't miss it one bit. Gus, our Lab/Shepherd mix, happily ate his sausage for him.
We ate this with a little naan and a cucumber salad (cucumber, diced tomatoes, dill, mint, salt, goat-milk yogurt, and a little mayo). I sure wish I had taken a photo.
Of course I have enough leftovers for 2 lunches later this week. Of course they'll taste even better the second and third time around. Flavors like this always develop further over a day or two. And because I wrote a blog post I'll remember this and make it again. Hopefully, there will be pictures.
The Persistence of Memory gets a new hairdo
"Did you change your hair? Lose a couple pounds? New lipstick shade?" All those questions when it's you, but a little different. What, exactly?
A few months ago I wrote about Fresh Apple Cake (Persistence of Memory, Jan '17). It had cycled out of my repertoire, and then when I made it for Joe, it settled back into regular rotation. I've been making it as apple cupcakes. Adding chopped dates when my brother brought a fresh box from the Syrian family grower down in Brawley. Tweaking the proportions, seeing just how little sugar I can get away with and still taste cake (honestly, 1 1/2 cups is still the gold standard. Although with less sugar--and using whole wheat pastry flour--what you get is delicious apple muffins for breakfast--nothing wrong with that). All slight variations of the standard Apple Cake.
Then, the other day we were heading to Joe's place for dinner and dropped by a bakery to bring a little dessert, which turned out to be carrot cake. I love certain things about carrot cake but it is generally too-too: too rich, too sweet, and too cinnamon-forward for me. Part of what I love about Fresh Apple Cake is that it isn't any of those things--it's just right. The ingredients profile for both cakes is quite similar, just different proportions. So why not try a mash-up?
Why not, indeed. Fresh Apple Cake, but with a different hairdo.
Fresh Apple Cake calls for 4 cups shredded apple. This time I used 3 cups apple, 2/3 cup shredded carrot, 1/3 cup crushed pineapple (juice squeezed out), and threw in 2/3 cup raisins. Everything else the same.
The result? That harvesty flavor I love from carrot cake, nestled in the perfectly balanced proportions of apple cake.
A few months ago I wrote about Fresh Apple Cake (Persistence of Memory, Jan '17). It had cycled out of my repertoire, and then when I made it for Joe, it settled back into regular rotation. I've been making it as apple cupcakes. Adding chopped dates when my brother brought a fresh box from the Syrian family grower down in Brawley. Tweaking the proportions, seeing just how little sugar I can get away with and still taste cake (honestly, 1 1/2 cups is still the gold standard. Although with less sugar--and using whole wheat pastry flour--what you get is delicious apple muffins for breakfast--nothing wrong with that). All slight variations of the standard Apple Cake.
Then, the other day we were heading to Joe's place for dinner and dropped by a bakery to bring a little dessert, which turned out to be carrot cake. I love certain things about carrot cake but it is generally too-too: too rich, too sweet, and too cinnamon-forward for me. Part of what I love about Fresh Apple Cake is that it isn't any of those things--it's just right. The ingredients profile for both cakes is quite similar, just different proportions. So why not try a mash-up?
Why not, indeed. Fresh Apple Cake, but with a different hairdo.
Fresh Apple Cake calls for 4 cups shredded apple. This time I used 3 cups apple, 2/3 cup shredded carrot, 1/3 cup crushed pineapple (juice squeezed out), and threw in 2/3 cup raisins. Everything else the same.
The result? That harvesty flavor I love from carrot cake, nestled in the perfectly balanced proportions of apple cake.
Wednesday, August 29, 2018
Blue-Collar Mac 'n Cheese
For my mac 'n cheese fangirls, sorry it's taken so long to get this post on the books. Trust me, it's worth the wait!
This is another recipe grace of the angels of the LA Times kitchen. I first learned to cook with those blue boxes of atomic Kraft Mac 'n Cheese. Apparently the daughter of the Times writer learned the wholesome way on this recipe which, as it turns out, is almost as easy. And oh, so so delicious.
The first time I make a recipe I follow it to the letter to get a feel for it. I can't help playing around with the details after that, though. I found that the more gourmet the cheese profile, the less successful the mac. This dish should comfort your palate, not challenge it. The combination I personally liked the most is noted at the top of the page in my recipe book, but I don't make this dish for me--it's my pot 'o love for my husband, for my mom, for Darla's daughter Catherine to keep in her dorm freezer and heat up when she needs a tummy hug.
The combination that all my mac 'n cheese people love the most is actually the simplest, most downhome version, straight from my WinCo grocery cart. No fancy twirly pasta, no Tillamook sharp or Trader Joe's goat milk cheddar. Blue collar ingredients all the way. I do replace some of the milk with coconut milk (not the coconut-ish drink product you pour on your cereal) and add green chiles (if I'm ambitious I roast a couple of Anaheim or pasilla chiles myself; it's easiest to just open up a can of Ortega chiles. I have to credit Tim with this addition to the recipe).
So here's the recipe:
1 lb elbow macaroni
1/2 stick butter (4 oz)
1/4 cup flour
2 cups milk (this is a good time to use old milk that's a day or two past its date)
1/2 tsp black pepper
2 bay leaves
8 oz medium cheddar cheese (or goat milk cheddar)
8 oz colby jack cheese (or gruyere)
4 oz parmesan, romano, or asiago cheese
1/4 - 1/2 cup diced green chiles
4-5 dashes Tapatio or Tabasco sauce
Boil the pasta in generously salted water (this is the only salt you'll use so don't be stingy). If you are planning to serve this dish right away, boil until al dente (but not a second more--the pasta will continue to soften a little in the warm cheese sauce). If you are cooking now to reheat later, take the pasta out of the water one minute before al dente, otherwise you'll end up with mushy macaroni.
Grate the cheese in your food processor (do NOT use pre-grated cheese--it's coated to keep it from clumping and will not make your cheese sauce happy).
In a large saucepan, melt butter over med-high heat. Whisk the flour in quickly to avoid lumps. Reduce heat and cook two minutes, whisking constantly. Continuing to whisk, slowly add milk, then pepper and bay leaves.
Cook, whisking, until mixture is thick as heavy cream (this doesn't take long). Remove from heat and fish out bay leaves. Gradually add cheese and stir to melt. Add a few dashes of Tapatio or Tabasco and the green chiles.
Stir in pasta.
Because I'm making this for lunches, I portion it into vacuum-seal bags and freeze. 1 1/2 cups makes a hearty serving. The packets I stashed in Catherine's dormroom freezer were smaller 1-cup portions, something to get her through a midnight study session. Whatever size portion, before I pop them in the freezer I press my finger along the center of the packet to create an open space. This makes it easier to reheat, since microwaves work better when there isn't a solid center.
Honestly, the amount of time it will take you to cook the macaroni and cheese is less than the minutes it took you to read this post. The dish is so easy your kids can help, and by the time they're old enough to whisk butter and flour together you can go watch an episode of Chopped and show up when the plates go on the table. Bon appetit!
This is another recipe grace of the angels of the LA Times kitchen. I first learned to cook with those blue boxes of atomic Kraft Mac 'n Cheese. Apparently the daughter of the Times writer learned the wholesome way on this recipe which, as it turns out, is almost as easy. And oh, so so delicious.
The first time I make a recipe I follow it to the letter to get a feel for it. I can't help playing around with the details after that, though. I found that the more gourmet the cheese profile, the less successful the mac. This dish should comfort your palate, not challenge it. The combination I personally liked the most is noted at the top of the page in my recipe book, but I don't make this dish for me--it's my pot 'o love for my husband, for my mom, for Darla's daughter Catherine to keep in her dorm freezer and heat up when she needs a tummy hug.
The combination that all my mac 'n cheese people love the most is actually the simplest, most downhome version, straight from my WinCo grocery cart. No fancy twirly pasta, no Tillamook sharp or Trader Joe's goat milk cheddar. Blue collar ingredients all the way. I do replace some of the milk with coconut milk (not the coconut-ish drink product you pour on your cereal) and add green chiles (if I'm ambitious I roast a couple of Anaheim or pasilla chiles myself; it's easiest to just open up a can of Ortega chiles. I have to credit Tim with this addition to the recipe).
So here's the recipe:
1 lb elbow macaroni
1/2 stick butter (4 oz)
1/4 cup flour
2 cups milk (this is a good time to use old milk that's a day or two past its date)
1/2 tsp black pepper
2 bay leaves
8 oz medium cheddar cheese (or goat milk cheddar)
8 oz colby jack cheese (or gruyere)
4 oz parmesan, romano, or asiago cheese
1/4 - 1/2 cup diced green chiles
4-5 dashes Tapatio or Tabasco sauce
Boil the pasta in generously salted water (this is the only salt you'll use so don't be stingy). If you are planning to serve this dish right away, boil until al dente (but not a second more--the pasta will continue to soften a little in the warm cheese sauce). If you are cooking now to reheat later, take the pasta out of the water one minute before al dente, otherwise you'll end up with mushy macaroni.
Grate the cheese in your food processor (do NOT use pre-grated cheese--it's coated to keep it from clumping and will not make your cheese sauce happy).
In a large saucepan, melt butter over med-high heat. Whisk the flour in quickly to avoid lumps. Reduce heat and cook two minutes, whisking constantly. Continuing to whisk, slowly add milk, then pepper and bay leaves.
Cook, whisking, until mixture is thick as heavy cream (this doesn't take long). Remove from heat and fish out bay leaves. Gradually add cheese and stir to melt. Add a few dashes of Tapatio or Tabasco and the green chiles.
Stir in pasta.
Because I'm making this for lunches, I portion it into vacuum-seal bags and freeze. 1 1/2 cups makes a hearty serving. The packets I stashed in Catherine's dormroom freezer were smaller 1-cup portions, something to get her through a midnight study session. Whatever size portion, before I pop them in the freezer I press my finger along the center of the packet to create an open space. This makes it easier to reheat, since microwaves work better when there isn't a solid center.
Honestly, the amount of time it will take you to cook the macaroni and cheese is less than the minutes it took you to read this post. The dish is so easy your kids can help, and by the time they're old enough to whisk butter and flour together you can go watch an episode of Chopped and show up when the plates go on the table. Bon appetit!
Sunday, January 28, 2018
Oat Bran Muffins
Every time I stay at my mom's she sends me home with a bag of these muffins. They're good Mom Food--tasty, nutritious, and unfussy. They're light but stick to your ribs, with no flour (naturally gluten-free, and--for those like me avoiding simple carbs--low on the glycemic index) so I started making them myself for the in-between-visits times.
Mom pulled the recipe off the back of the Quaker Oats oat bran box. Their bran is more finely milled than most, and when I tried making it with another brand it sat heavy in the muffin tin. So I put my bran in my food processor and milled it finer, and the recipe worked again. Then, I tried simply letting the batter sit in the mixing bowl a bit before portioning into muffin pans, and that worked just as well--the liquid had a little more time to soak into the bran, so it didn't matter whether it was as finely milled.
Oven 365.
2 cups oat bran
2 tsps baking powder
3/4 tsp salt
2 eggs, lightly beaten
1 cup mashed banana (when a banana gets a little brown I toss it in the freezer. It thaws quickly into the perfect consistency for cooking)
1/2 cup orange juice
2 Tbls oil
1/4 cup honey (I smear the oil residue left in the measuring spoon into the 1/4 cup measure, then pour the honey in--it'll slide right out into the batter)
Add-ins: raisins, mini chocolate chips, chopped nuts, dried cranberries (about 1/2 cup altogether, although I tend to overadd and never regret it)
Mix the bran, baking powder and salt. Add the eggs, banana, orange juice, honey, and oil. Mix until incorporated, but don't overdo it. Even though you aren't worrying about developing gluten, you don't want to beat out the air bubbles you just mixed in with your liquids. Toss in whatever combo of add-ins and stir just enough to distribute.
Spoon into muffin tins or silicone cups. I use a silicone muffin pan that's a little wider and shallower than my metal tin and fill them pretty much to the top. These muffins have a nice light fine-crumb texture, but they aren't going to raise up fluffy with that traditional muffin top since there isn't any refined flour in them.
Bake at for about 15 minutes or so (it really depends on what kind of pan, size, etc.). Keep an eye on them, and when they're golden, test with a toothpick or cake tester. Remove from oven and turn out onto a cooling rack.
Store in a ziplock bag in the fridge. Heat your muffin in the microwave for about 20 seconds for a fresh tasty breakfast or snack anytime during the day!
Every time I stay at my mom's she sends me home with a bag of these muffins. They're good Mom Food--tasty, nutritious, and unfussy. They're light but stick to your ribs, with no flour (naturally gluten-free, and--for those like me avoiding simple carbs--low on the glycemic index) so I started making them myself for the in-between-visits times.
Mom pulled the recipe off the back of the Quaker Oats oat bran box. Their bran is more finely milled than most, and when I tried making it with another brand it sat heavy in the muffin tin. So I put my bran in my food processor and milled it finer, and the recipe worked again. Then, I tried simply letting the batter sit in the mixing bowl a bit before portioning into muffin pans, and that worked just as well--the liquid had a little more time to soak into the bran, so it didn't matter whether it was as finely milled.
Oven 365.
2 cups oat bran
2 tsps baking powder
3/4 tsp salt
2 eggs, lightly beaten
1 cup mashed banana (when a banana gets a little brown I toss it in the freezer. It thaws quickly into the perfect consistency for cooking)
1/2 cup orange juice
2 Tbls oil
1/4 cup honey (I smear the oil residue left in the measuring spoon into the 1/4 cup measure, then pour the honey in--it'll slide right out into the batter)
Add-ins: raisins, mini chocolate chips, chopped nuts, dried cranberries (about 1/2 cup altogether, although I tend to overadd and never regret it)
Mix the bran, baking powder and salt. Add the eggs, banana, orange juice, honey, and oil. Mix until incorporated, but don't overdo it. Even though you aren't worrying about developing gluten, you don't want to beat out the air bubbles you just mixed in with your liquids. Toss in whatever combo of add-ins and stir just enough to distribute.
Spoon into muffin tins or silicone cups. I use a silicone muffin pan that's a little wider and shallower than my metal tin and fill them pretty much to the top. These muffins have a nice light fine-crumb texture, but they aren't going to raise up fluffy with that traditional muffin top since there isn't any refined flour in them.
Bake at for about 15 minutes or so (it really depends on what kind of pan, size, etc.). Keep an eye on them, and when they're golden, test with a toothpick or cake tester. Remove from oven and turn out onto a cooling rack.
Store in a ziplock bag in the fridge. Heat your muffin in the microwave for about 20 seconds for a fresh tasty breakfast or snack anytime during the day!
Sunday, December 24, 2017
Almond Cherry Cookies
I came across this recipe in the LA Times, knew I had to try it, but wanted to wait until Kaitlyn came for Christmas because the recipe is naturally gluten-free. It was worth my patience. The LA Times has been a source of many of my favorite recipes over the years--my butternut squash soup is the best I've ever tasted anywhere, anytime, and it's straight from the Food Section, as is the turkey chili also found in this blog.
This cookie recipe is from a bakery in Berkeley, requested by a reader in the Culinary SOS column because it is gluten free. I've never had a substitute-ingredients gluten-free baked good that was quite as satisfying as the original, but half my cookie recipes simply don't include flour. Who needs it when almonds, sugar, and egg whites make such a perfect bite?
The only change I've made in the instructions is the cookie size. The bakery's instruction was to form the balls from 2 tablespoons of dough, supposedly 1 ounce. I used my 2-Tbl meatball scoop and formed a few cookies, and realized they'd be 'way too big. So I weighed 2 Tbl of dough, and it was 2 ounces, not 1. I also changed how I formed the dough around the cherry. I like things easy.
Almond Cherry Cookies
About 30 dried cherries, preferably sour
1 pound blanched almonds
2 cups sugar
3 egg whites
1/2 tsp almond extract
pinch salt
Place cherries in a pyrex bowl and pour boiling water over to soak. Grind the almonds and sugar together in a food processor until a fine, flour-like texture. Add egg whites and almond extract and pulse until the dough comes together and balls up. Wrap in plastic and chill. Drain the cherries and lay out on paper towels to dry a bit.
Heat oven to 325 degrees. Line cookie sheets with silpats or parchment. Form 1-ounce cookie balls using a 1-tbl scoop or spoon. Flatten the center of the ball with your thumbs, place a cherry in the dent, and wrap the dough up around the cherry to make a ball again. Place cookies about 1 1/2 inches from one another on the sheet, flattening a little.
Bake for about 20 minutes until lightly golden at the edges, rotating cookie sheet halfway through for even baking. Cool completely on a wire rack before storing in a sealed container.
We all loved the cookies, assuring ourselves that this much almond must be healthy (as I assure you it is). Tim was conducting a series of gin and whiskey tastings along with the cookies, and I highly recommend St. George Botanivore gin as the perfect accompaniment. Kaitlyn and I wondered why the recipe didn't just call for almond meal, but then decided that the chemical reaction from grinding the almonds with the sugar was likely an essential component of flavor and/or texture. And, it makes the house smell really good.
Next time I make this recipe I'm planning to try variations--dried dates, cranberries, or apricots soaked in a little Cointreau could be delicious. Basically anything that pairs well with almonds. The one guarantee is that this recipe is going into regular rotation, because it is so easy, and heaven in your mouth.
Subscribe to:
Posts (Atom)